So, let's start with the process of replicating Final Fantasy 1 to build the tools we need to start building our ACTUAL game. In that vein, our first step is re-creating the navigable map, so we can start playing through the world. And the first step of creating a map? Creating the assets we are going to use to layout the map.
For our sprites, we're going to use the sprites available through https://www.spriters-resource.com/nes/finalfantasy/
And in bringing these sprites into NESmaker, we counter our first problem: colour matching. The first step for creating assets in the NESmaker is to import assets (if using assets created elsewhere) and give them assigned palettes, which involves drawing over the existing sprites with the colour options available in NESmaker.
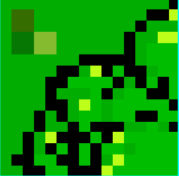
Some colours matched relatively well (such as the blues for the water) while others matched quite badly (such as the greens for the trees). This was going to take some looking into.
In doing a little bit of research since encountering this problem, it looks as if there's no single agreed upon NES colour palette. Every slight software change and television screen provided a slightly different hue and shade. The NES itself is limited to a total of 56 colour options, which NESmaker limits to 53 for some programming reasons, which leaves us with 52 specific colours, plus black.
So, let's do a comparison of colours between Final Fantasy 1 and a few of the colour palettes for the NES that I can find. We'll use three for this reference: one from a website called Lospec.com, one from Wikipedia, and, of course, the colour palette available to us through NESmaker.

Even just comparing the first few columns of colours, we can see quite a distinct difference in the colours of each set. But how do these compare to the actual Final Fantasy 1 assets themselves?

As we can see, when it comes to matching actual sprite colours, the Lospec palette works best, but we're restricted to the NESmaker palette. While that is a bit unfortunate, it at least means we can compare sprite colours to the Lospec palette and use those colour positions to determine which colours we should be using in the NESmaker pallette.
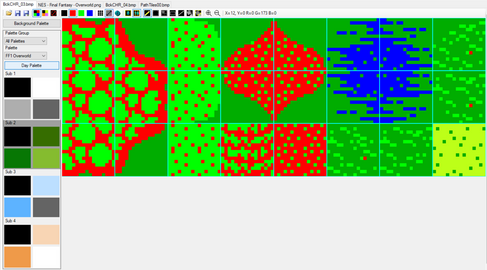
We start by opening the Final Fantasy 1 Overworld Assets in RPGmaker.

We can see from this set of Overworld tiles that there are 4 primary colour schemes used, which matches with our 4 possible palettes. We have the white/grey used by the mountains, towns, and boat docks, the green/yellow used by the trees/swamp/marshlands, we have the blue waters, and the tan deserts.
Now, however, we need to split them up into usable chucks and make them usable by NESmaker. NESmaker's system for making game screens lets us use, at most, two main tilesets of 24 tiles each, plus two additional screen-specific tilesets of 8 tiles each. Just looking at how many assets are used across the overworld, we don't have enough for just these tiles alone, let alone any additional tilesets that may be needed for text display or other purposes. That's something we're going to have to figure out as we go along.
For now, we'll start with two main tilesets.


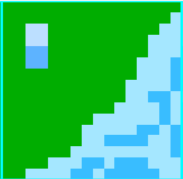
How NESmaker works is that sprites won't show properly unless they are un 4 colours: red, green, blue, and black. These mad to the pallete colours with black being the top left, red the top right, green the bottom left, and blue the bottom right. This allows the assets to be re-used with any of the 4 colour palettes available at any time. Want a forested mountain instead of the usual snowy peaks? When I'm assigning it to the screen, I can do so with the green colour palette and it will show up with those colours assigned to the corresponding location. It makes for very efficient use of assets, allowing for theoretically quadruple the use of an asset without any additional storage space taken up.
With our primary assets created, now we need to figure out how to create a map that can be navigated across while the camera moves with the player. By default, the screens are made up of either 16x15 16-pixel tiles (why it isn't 16x16, I have no idea), or 32x30 8-pixel tiles. The latter allows for more detail, but takes up 4x the memory usage to allow for the "half" tile size of 8 pixels. And, based on their default tutorial (which demonstrates how to create a top-down adventure style game ala the original Zelda), sprites are generally confined to a single screen. So, how do we allow movement across screens?
Thankfully, NESmaker includes a tutorial for creating a Mario-style game as well. Mario-style games requrie scrolling movement across a horizontal collection of screens, so it shouldn't be too hard to adapt to a 4-way movement system....

You know that saying about putting the cart before the horse? Yeah, I should really learn to watch what I say. Getting left to right scrolling? That wasn't too bad. Grab some of the code from the metroidvania base, plop it into the adventure base, all is well.
Getting vertical scrolling working?
Turns out, the left/right scroll input works by getting the data on button press, and communicating with a camera update code segment. That camera update code? It has no segments for vertical movement, and is over 600 lines of 6502 Assembly long. So, this is going to be harder than I thought. In fact, the more I look into all the base clode that comes alongside various NESmaker modules, the more I come to terms with the fact that I'm going to have to learn a lot more Assembly than I first thought, or hoped to do at all.

After several days of trying to fully comprehend both 6502 Assembly, as well as the unique way that NESmaker utilizes it, I need to temporarily admit defeat and move on. I can't spend an entire week just trying to figure out how to implement a vertical scroll at the detriment of everything else. For now, we'll put a pause on that, progress forward with horizontal scroll, and work to make upgrades to the camera later when we understand a bit more.
The first step is making all of our assets. Just like we did above, we need to convert our required assets into the 4 colour (RGB+Black) sprites. In this case, that is three sets: Town, Castle, and Chaos Shrine. This actually led me to realize that the town sprites are shared across all towns in the game, which is very helpful.


And this is where you get to see the perils of working with new software that you haven't mastered. Each of those above tile sets (which each have two 24-tile collections as well as at least one additional 8-tile screen specific selections) took well over an hour (sometimes longer) to colour replace, ensuring that everything was done correctly. Only as I was finishing up the final collection of sprites (the Chaos Shrine, did I notice the "fill by colour" tool.

You see this little tool? It fills all pixels of the colour you click on with the appropriate RBG colour (depending on which colour from your palette you have selected. This would have saved me HOURS of work, and I discovered it at the end. Oh well, live and learn.
Our next step? We actually have to lay out the maps we need. We will need the overworld of Corneria, the town, the castle, and the chaos shrine.
And with the power of the passage of time, you get to see the results now!


This was ALSO several hours of work, painstakingly selecting the tiles, painting them on, and ensuring that the assets were all placed into the correct locations to match with their actual game locations. But we're not done. Painting on the sprites is only step one. Now we need to give them COLLISION.
With NESmaker, you get to 'paint' on your collision to your maps. But this doesn't just mean actual collision. Essentially, you can create various things for tiles to do, and using the collision painter, you can assign those attributes to various tiles on your map.

In this case, we are painting the water with a "solid" tile. While I know in actual Final Fantasy 1 the water would be passable with the boat, we won't be progressing that far in the recreation, so there's no need to code that programming in. So by painting all impassible tiles with the collision of solid, and those that transport you elsewhere with the appropriate assets, we can make the map actually playable.
And here, however, we have run into a final issue for getting this milestone completed: the horizontal scroll is creating issues in regards to both tilesets and collision. On the overworld, when you transition between the screens, if they have different tilesets assigned it causes the game to assign the wrong graphics, and collision goes haywire. While in the town, castle, and chaos shrine we don't get the graphics issue, the collision attributes are messed up as soon as you scroll between screens.
I have a feeling that this is going to take more time to figure out, but I can't spent any more time on it for now. I have other attributes to look into. So, for now? We're going to treat screen transitions as one would in Zelda or other top-down adventure games: reaching the edge of the screen will warp to the next screen. This will get us around our tileset and collision issues. This means turning off the screen scroll for now. We'll fix these issues in the future, as I learn more. So, where does this put us in terms of our milestones?
Week 1: July 14th - 20th
Navigable Map - Completed, with adjustments
Accessible Town/Dungeon Maps - Completed
Environment Assets Interactions - Delayed
So, with two tasks completed, and one delayed due to issues with the prior tasks, we look to the next week:
Week 2: July 21st - 27th
NPC Interaction
Pause Menu
Given what I've already figured out from just this past week, both of these are going to be harder than I expected. Still hopefully the former should just be checking for a "enemy" next to the player and an a button press (though bringing up a dialogue prompt will likely be tricky), and the latter will hopefully be storing a current location and its data, and warping to a separate screen that will handle the menu.
But the only way to find out how wrong I am is to get started. See you all next weekend!
Comments